Getting Over It Full Map Guide – Best Route & Hidden Details
This article is for those players who don’t just want to play the game — they want to understand the psychology behind the Getting Over It Map Guide. Every gamer wants a proper idea of how the terrain works. Every jump, every angle, every ledge is strategically designed to test, not confuse you. That’s why we’ve brought you a full map breakdown, with names for every area — so you can plan your climb with clarity and confidence.
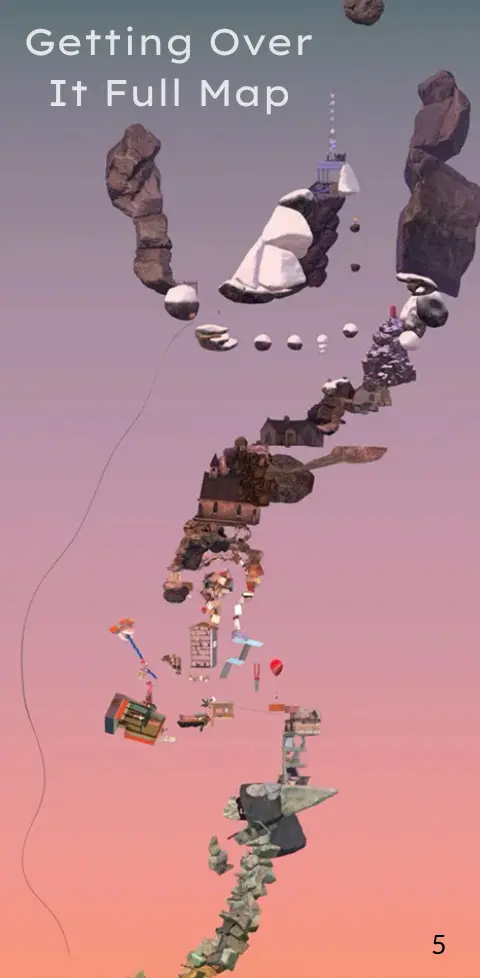
Getting Over It Map Guide
Starting Area
Right when the game starts, you see a man — Diogenes — stuck inside a heavy metal pot. And that calm-looking lake on the left? It’s your first trap. Fall in, and you’re done — because that pot isn’t a swim tube. It’s so heavy that the moment you hit the water, you sink like a rock.
On the right side, you’ve got rocks and trees — the game’s first soft lesson. This is where you start to understand the hammer’s reach, rotation, and balance. Master it here, or trust me, you’ll be crying later.
The Tree and Branches
The first area gently teaches you what the sledgehammer is really about. You jump across trees, swing on branches, and learn how to grip — all in a safe space. There’s no real risk of falling here, which puts beginners in a comfort zone. It’s the best time to learn without fear.
Devil’s Chimney
This is where both your precision and patience are pushed to the limit. The Devil’s Chimney in Getting Over It is the ultimate test of composure — a narrow tunnel where you have to rely on lamps to climb using just your hammer. One wrong grip, and you either make progress… or fall all the way back to the start. Brutal, but fair.
Construction Site
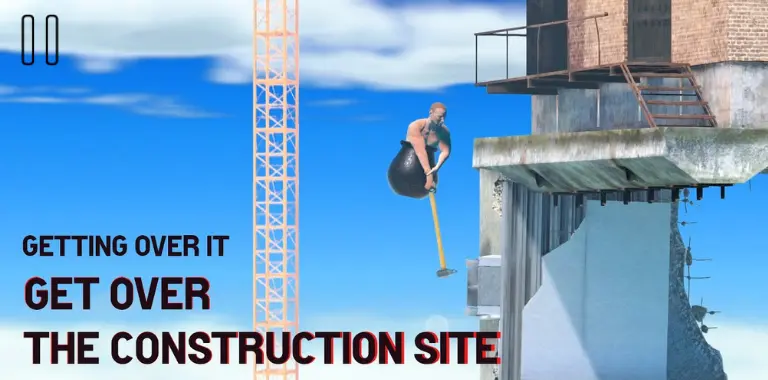
Just when you breathe a little after escaping Devil’s Chimney, the game grabs you again — this time dragging you into the chaos of Construction. It’s no ordinary mountain now, it’s a concrete jungle. Barrels, pipes, and that massive crane in the background constantly mess with your focus. Every hammer swing has to be precise — one wrong angle, and boom… you’re sent sliding right back to the earlier zone.
Furniture Land
Reaching the top of the crane feels like an achievement — like the game is finally giving you a break. But just a moment later, you fall straight into Furniture Land, where every item — tables, drawers, paintings, shelves, and lamps — becomes an obstacle. Movement gets frustrating, as swinging your hammer in those narrow spaces becomes seriously tricky.
Orange Hell
Right after Devil’s Chimney and the Construction Site, just when you think the worst is over — boom, welcome to Orange Hell. The name says it all. A red table with a few oranges sits ominously, and thanks to the lighting, even the rocks glow orange. But it’s called ‘hell’ for a reason — one slip, and you’re all the way back to the start of Furniture Land. Narrow paths, steep edges, and every jump feels like a gamble. Only the players who think ten times before every move survive this zone.

The Slide
Just before reaching the gates of Orange Hell, there’s a slippery slide that puts your patience to the ultimate test. This section is designed in such a way that even a slight imbalance can send you crashing all the way back to the bottom of the Furniture Zone. The only way to survive here is one word: accuracy.
Radio Tower
The Radio Tower — the game’s final trial. It’s called the “Bad End” for a reason: this is where most players slip. The path gets brutal, and the hammer often locks up. But if you conquer this level, your name belongs among the legends of Getting Over It.

Conclusion
By now, you’ve probably become quite familiar with the Getting Over It Map Guide It. Every area brings its own challenge — but that’s exactly what makes the game fun. Each zone has a distinct color theme — starting with green, then moving through blue and orange, and finally ending in deep black space. These colors aren’t just for decoration — they reflect the game’s progression. If you’ve come to understand all this, then consider yourself ready to complete the game with confidence.

